‏إظهار الرسائل ذات التسميات flashing. إظهار كافة الرسائل

الأربعاء، 20 يناير 2016

How to extract files from System.img


 With these steps you can to extract files from the system.img (found in MTK based android stock Rom or Custom Rom) using ext4 tool on Windows Computer.

Extract files from System.img in android

 The procedure:

===>: Download and extract Ext4 Unpacker tool on your Windows Computer. After Extracting you will be able to see the following files:


===>: Download and extract ext2explore tool on your Windows Computer. After Extracting you will be able to see the following files:


===>: Download and extract the MTK based ROM (For Instance: download micromax a200 firmware which contains system.img file) on your computer (If you have already downloaded and extracted the ROM on your computer then SKIP this step).
===>: Now, Open Ext4_Unpacker.exe (found in the files you have downloaded in Step#1).
===>: Once Ext4_Unpacker.exe is launched, click on the folder icon and locate the System.img file or any .img file you want to extract.


 ===>: Once Image file is loaded, click on the the Save as Ext4 button.


===>: Now, choose the location where you want to save the .ext4 file (example: save it to the desktop) and then press Save button.


===>: Now, you have to wait for few minutes while the ext4 image is being unpacked.


===>: Now, Open ext2explore (extracted in Step#2) and select the .ext4 file that you have saved on the desktop.


===>: Now, highlight the file you just have imported in EXT2Explore and then press the “Save” button.


===>: Select where you want the unpacked system files to be placed.


===>: After that Ext2explore will extract the system files on your computer (it may take couple of minutes to complete).


Congratulations, you have successfully extracted the system.img file on your compute

Source:

الاثنين، 2 نوفمبر 2015

HOW TO MAKE ANDROID MTK SCATTER FILE


HOW TO MAKE ANDROID MTK SCATTER FILE


 Scatter File

A Scatter file, in android is a file used to describe the loads of regions in a specific android device which is running MediaTek's ARM architecture. Usually, SP Flash Tool needs scatter files to read its loads to revive an android from bricking or for other flashing things if you have worries on how to create your own scatter file for your android devices, this tutorials will offer a lot of help.

 How to make a scatter file for any MTK android device

The steps are applicable for android devices with:

Mediatek MT6595, MT6592, MT6589, MT6582, etc chipsets

To create a scatter file, we have to prepare all the requirements to ensure we can successfully make one without any trouble. In this case, we need the following:

Requirements:
MTK android device: rooted or unrooted
Steps:
     I.        Enable USB debugging. Check if it is enabled on your device Settings - Developer options
   II.        Connect your android device to you computer via USB cable. Drivers must be loaded automatically since you have drivers installed from PdaNet.
  III.        From your computer, run MTK Droid Tools application as administrator (except for Windows XP).

 IV.        Wait a moment for MTK Droid Tools to load your android device's info.

   V.        When the tool is finished loading your device, click Blocks Map.


 VI.        A new window will come up, click Create scatter file.


VII.         Go to where you want to save the scatter file of your device. Save it to somewhere safe because it can be used for future flashing.


VIII.        Finished. 

Enjoy!

الجمعة، 30 أكتوبر 2015

How to Flash Recovery in Android Phone

How to Flash Recovery in Android Phone

Do you want to flash recovery for your android?

Have you been searching from the web on how you can carry out flash recovery? Well search no more. So you came to the right place, as we are going to give a step by step approach on how you can flash your recovery to that smart device of yours. Be it a novice or a professional this guide will assist a long way to avoid unfortunates mistakes.

So how do I install any recovery on my android phone?

We have many methods of doing this, as such I will try to provide you with the easy how to guide. We can carry out the flashing by only using your phone, the simplest one which I am  going to show you on this guide, alternatively we can do the flashing using a computer, be it  a PC or Laptop, it doesn't matter but little bit difficult. I alternate the article on how to do it with the use of a PC because the guide was a bit long as it was done thoroughly without problem.


So how do I Flash any Recovery in my Android Phone

We will be using two good applications that are very efficient in flashing recovery, it can be used on a stock or a custom recovery such as CWM, TWRP, provided it was ported and meant for your device model and build.

IMPORTANTLY:
ü  Since you are superuser, you are advised that you understand the risks.
ü  Ensured that the recovery image is stored on your phone's SD Card and named as "recovery.img" without the use of quotes. In some instatnces, it causes error once not renamed.
ü  Methods 1 and 2 is going to requires root access as such, your phone must be rooted. You can root your phone by following Best and Easy Ways to Root your Android Phone or by using KingRoot

STEP 1: Install any Recovery using Mobile Uncle Tools application
A.    Have Mobile Uncle Tools downloaded and installed on your phone
B.     Launch the app and if asked for superuser rights, Grant to it.
C.     Select Recovery Update then locate and select the recovery image from which you renamed as "recovery.img"
D.    Select OK and the installation process will begin.
E.     Once done, you will be asked to boot Into Recovery Mode. Press it.
F.     If booted successfully, you are done with it.

STEP 2: Using Rashr Flash Tool
1.     Download and install Rashr Flash Tool app on your android phone.
2.     Open it and when ask for root permission, Grant to it
3.     Select  Recovery ++Other from storage
4.     Chose the recovery image that you previously have renamed
5.     Agree to continue the installation. Tap Yes when it prompted you.
6.     Wait few sec and tap on Reboot to Recovery.
7.     Your phone will boot in recovery mode. Check if the recovery was installed properly if you successfully booted on it.
8.     Done wit it.
STEP 3: Using SP Flash Tools (A little bit complex)

 The instructions for this is created separately. If you really want to carry out the process, simply follow the instructions bellow:

Flash Stock or Custom Recovery using SP Flash Tools

v Just download the following  Apps:

Rashr Flash Tool – through Mediafire
Mobile Uncle Tools - Google Drive
And you are good to go!
Goodluck.

How To Dump And Backup AN Android ROM


How To Dump And Backup AN Android ROM

Am going to show you how to backup or make a ROM dump on any android phone


So, you came to fully backup your device or make a ROM dump? While thinking of my next article to write, I just thought of making a ClockworkMod (CWM) flashable zip for applying mods but considering the possible risks on our android device, I thought of creating a current ROM backup state in case something unwanted happens. Well, here it is. 

On this article, I’ll be presenting the various ways and the step by step guides on how to fully backup ROM state or create a ROM dump on any android device (smart phones or tablets).

Ways to backup ROM and dump ROM applicable for any Android phones


If In case you don’t know, there are several ways to do a full ROM backup, that’s why I made this article so you can choose from the ways how to do it on your own which also varies from your device. So here are the ways which I already knew as of this time:


1. For MediaTek (MTK) devices, using SP Flash Tool and MTK Droid Root and Tools can help us make a full ROM backup or ROM dump.
2. For any device having ClockworkMod (CWM) recovery and TWRP, making a Nandroid backup can also provide one.
3. For all other android devices as long as it has ROOT access or Superuser rights, doing the simple ROM dumping method through romdump script for any partitions will work great.
                                                    

Easy way to dump or backup any android ROM


Disclaimer: We are not liable for any issues as a result of the procedure on your device. You are the one responsible of deciding to mess with your device so try at your own risk.

Things we need:
Like us To View This Content
This content is locked. Like us on Facebook or Google plus to unlock it.
Instructions:
1.   Open Root Explorer and extract romdump_v82b.zip.


2.   Copy the extracted romdump file, then paste it on the root data/local/folder.
3.   Open Terminal Emulator
4.   Type: su
5.   Type: chmod 04755 /data/local/romdump
6.   Type: /data/local/romdump


7.   The script will perform the ROM dump, just wait for it to be done.
8.   Once done, go to Root Explorer and find the romdump folder
9.   From there, you will see the backup / romdump you have made.

 Congrats! Now, you have made a ROM dump of your device. Use it as a backup or as a base ROM for making custom ROMs.


source: http://android.podtwo.com/romdump/
                       

الثلاثاء، 27 مايو 2014

Tomato Firmware installieren unter Linux

Anleitung: Wie flashe ich die Tomato Router-Firmware unter Linux
In diesem Artikel möchte ich euch erklären, wie Ihr die Tomato Firmware auf einen Router flashen (installieren) könnt. Wie so oft gibt es auf Deutsch so gut wie keine Anleitung dazu bzw. nur einen Artikel, der in etwa beschreibt, wie die Installation abläuft. Mein Ziel ist es einen VPN-Router zu "bauen" und mit Tomato geht das um einiges einfacher als unter DD-WRT/Open-Wrt. Zu Beginn habe ich mir einen günstigen Router gesucht, welcher mit Tomato Firmware ausgestattet werden kann. Dazu gibt es hier eine Liste, wo alle Router aufgelistet werden. Zuerst sollte es der Asus RT-N16 werden aber ich wusste nicht einmal, ob ich das unter Linux hin bekomme, daher habe ich mit den Asus RT-N12 bestellt und die D1 Version erhalten (keine 20€ bezahlt). Bevor wir beginnen, hier noch einmal der Hinweis:

Mit dem Flashen einer Custom-Firmware - in diesem Fall Tomato Shibby - verliert Ihr die Garantie und  Gewährleistung auf euer Gerät! Weder ich, noch sonst irgendwer übernehmen eine Haftung, für irgendwelche Schäden, die durch das befolgen dieser Anleitung geschehen! 
Anleitung auf eigene Gefahr!

Bedenkt immer dabei, dass das auch nach hinten los gehen kann und euer Router unbrauchbar wird.
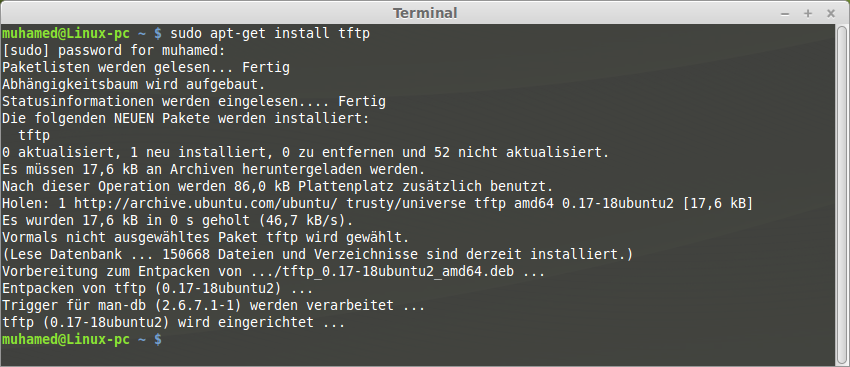
Um die Firmware zu übertragen verwenden wir TFTP.
Für die Installation führen wir diesen Befehl aus:
sudo apt-get install tftp
Auf der Homepage von Shibby schauen wir uns jetzt an, welche Version wir benötigen, da beim Download uns mehrere Versionen angeboten werden. Unter dem Router selbst (Aufkleber) ist die Revision zu finden. In meinem Fall gebe es vier verschiedene Versionen (vom Asus RT-N12) und ich habe die D1 erhalten, somit die zweite Spalte mit 8MB Flash (merkt euch diese Angabe). Unter Version wird K26RT-N angezeigt und dazu kommen wir jetzt:
Im Download-Bereich habe ich nun eine größere Auswahl. Hier klicke ich auf K26RT-N
Nun wähle ich das Build aus und achte dabei auf die Sprache, da einmal Englisch und einmal Polnisch angeboten wird. Auf der rechten Seite sehe ich das Datum und die Uhrzeit, wann diese Firmware hinzugefügt wurde. Ich wähle hier immer die neuste Firmware als in diesem Fall build5x-119-EN vom 24.05.2014.
Die Firmware ist nicht nur für mein Gerät gedacht, deshalb habe ich hier mehrere Hersteller und Modelle zur Auswahl. Da es kein Asus RT-N66u ist, kein Linksys, kein Netgear und auch kein Tenda (was auch immer das sein soll), habe ich hier auf Asus RT-Nxx geklickt.
Wir wären beim letzten Punkt und hier war ich mir zu Beginn selbst nicht sicher, da es eine große Auswahl gibt. Ich habe mir noch einmal die Liste angeschaut, bei den unterstützen Routern und dann gleich festgestellt, dass das Flashen von Firmware bei mir nur mit Firmware möglich ist, welche <8MB groß ist. Einen USB-Port habe ich an meinem Router auch nicht gefunden, somit blieben noch 4 Optionen übrig. Bei einem US-Board habe ich dann gesehen, was AIO bedeutet (all in one) und bei der Größe ist dann auch zu erkennen, wieso das so ist. In meinem Fall habe ich tomato-K26-1.28.RT-N5x-MIPSR2-119-Max.trx gewählt, da ich nichts zusätzliches installieren möchte und im MAX-Paket wohl alles mit dabei sein wird (auch keine 8MB).

Kommen wir zum Flashen der Firmware. Erst einmal sollten alle LAN-Kabel entfernt werden und sollte WLAN verfügbar sein, dann entfernen oder deaktivieren, damit es nicht zu Problemen kommt.
Den Router per LAN-Kabel mit dem Rechner verbinden und das Terminal aufrufen.
Router ausschalten und den Befehl sudo ifconfig eth0 down ausführen. Damit deaktivieren wir die LAN-Verbindung bzw. die Netzwerkkarte vom Rechner. Sollte der Router bereits verwendet worden sein, dann sollte dieser auf die Werkseinstellungen gesetzt werden. In meinem Fall muss ich dazu nur den Resetknopf 6 Sekunden lang gedrückt halten. Für das Aufspielen schalte ich den Router ein und halte den Resetknopf gedrückt (kann bei jedem Router anders sein - einfach im Handbuch nachschlagen). Nun gebe ich meinem Rechner eine feste IP-Adresse. Das mache ich mit dem Befehl sudo ifconfig eth0 up 192.168.1.2, da der Router die IP 192.168.1.1 hat. Jetzt schaue ich, ob ich eine Verbindung zum Router habe. Das geht mit ping + die IP-Adresse vom Router, in diesem Fall ping 192.168.1.1
Bei euch wird es so, wie im Bild oben aussehen, wenn eine Verbindung besteht.
Haltet STRG gedrückt und drückt C, um den Vorgang abzubrechen. Wichtig ist dann unten die Angabe unter packet loss. Hier sollte 0% angezeigt werden!
Wechselt in das Verzeichnis, wo sich die Tomato-Firmware befindet. Mit ls noch einmal den Inhalt anzeigen lassen und nun kommt TFTP zum Einsatz.
Wir geben ein: tftp + RouterIP -> bei mir -> tftp 192.168.1.1
Jetzt geben wir mode binary ein und dann mit put + Firmwarename.trx wird die Firmware übertragen. Sollte das erfolgreich sein, dann wird euch im Terminal angezeigt, wie lange es gedauert hat (Bild - vorletzte Zeile).
Sobald das passiert ist warten wir min. 5 Minuten. Nach diesen 5 Minuten schalten wir den Router aus, warten mind. 20 Sekunden und schalten den Router wieder ein.
Wir warten solange, bis unser System eine Verbindung aufgebaut hat. Dann rufen wir über die IP den Router auf:
Einfach den Browser öffnen und in die Suchleiste 192.168.1.1 eingeben, dann werdet Ihr nach User Name & Password gefragt (siehe Bild) und schon seid Ihr im Router Menü von Tomato.
Mein eigentliches Ziel ist es jetzt aus dem Router einen CyaberGhost VPN Router zu machen.
Dazu wird es auch später eine Anleitung geben. Für mehr, bitte die Blogsuche verwenden und nach Tomato suchen.
Sollte es hier Fragen geben, dann könnt Ihr natürlich schreiben ;)

الثلاثاء، 25 يونيو 2013

CyanogenMod 10.1 stable build released today but few phones with Tegra and Exynos missing from lineup

Team CyanogenMod today announced the release of latest version of its ROM, the Cyanogen 10.1 stable release.  As of now there are over 50 devices supported by this release. The list of supported will continue to grow as the CyanogenMod releases more updates.  
CyanogenMod 10.1 stable build released today but few phones with Tegra and Exynos missing from lineup


As of now, the team doesn't plan on releasing the ROM for devices that haven't had release candidates of 10.1 released for them so far.  The CyanogenMod team has also announced that the build will not be available for devices that run on Tegra 2 and some of Samsung's Exynos-powered devices which include Galaxy S III (International I9300 model), Galaxy Note 1 and 2.  CyanogenMod will release a status report for these devices as early as next week.  

As of now the following smart phones are supported 
Samsung :
Captivate, Vibrant, Galaxy S2 SkyRocket, T-Mobile Galaxy Note 1, AT&T Galaxy Note 1, Galaxy Tab 2 10.1 WiFi and GSM models, Galaxy Tab 2 7.0 WiFi and GSM models, Galaxy S2 I9100G, T-Mobile Galaxy S2, Galaxy S, Galaxy S B model, Epic 4G, Verizon/ US Cellular/ Sprint/ T-Mobile / MetroPCS/ Cricket/ AT&T Galaxy S3 variants.

Sony : 
Xperia Z, Xperia ZL, Xperia T, Xperia Tablet Z, Xperia V.

Google :
Sprint and Verizon Galaxy Nexus, Nexus 7 GSM, Nexus Q, Nexus 10, Galaxy Nexus GSM International, Nexus 7 WiFi.

HTC One X is listed as a supported device but there is no word about support for HTC One(Released in 2013)

CyanogenMod’s ROMs are custom ROMs based on the Android Open Source Project (AOSP) and come without any gloatware, bloatware that the carriers or manufacturers often add to the smart phones before shipping it.  It also removes the default custom UI like Sense for HTC which is often criticised

Further the CyanogenMod ROMs always give you, the user a way to incorporate additional tweaks and tools to improve performance and battery life.  It also grants you root access which mean you can always try out new things like install, modify and tweak system-level apps and code in the Android operating system.

CM 10.1 is based on Android 4.2.2 Jelly Bean, whereas CM 10 was based on Android 4.1. CyanogenMod 9 is based on Android v4.0.4 (Ice Cream Sandwich), and while many of the ports for unsupported devices have some issues, the team counts the ROM stable enough and said that they will be maintaining the ROM and fixing any major issues that come up.

Interested, then visit the CyanogenMods web portal here and get the ROM of your choice.  Remember that your devices needs to be carrier-unlocked, rooted and the CWM or TWRP Recovery installed.


الاثنين، 24 يونيو 2013

One stop App for installing Custom Recovery Mod like ClockworkMod or TWRP on Android devices

First and foremost please note that this article is only meant for those who know how to root phones and are familiar with rooting process, ClockworkMod and TWRP.  If you are not familiar with the process, do not attempt it, it will void your warranty and sometimes brick your phone.
One stop App for installing Custom Recovery Mod like ClockworkMod or TWRP on Android devices

XDA Forums Member DsLNeXuS has published a App on Google Play which is one stop shop for hassle free pre defined loading of custom-recovery system for your Android device and installing them automatically.  As already said above it requires a rooted phone.  

The Models currently supported by this Recovery Tools App are :

----- [TWRP & CWM] -----

-Nexus One (passion)
-Nexus S (crespo/crespo4g)
-Galaxy Nexus (maguro/toro/toroplus)
-Nexus 4 (mako)
-Nexus 7 (grouper/tilapia)
-Nexus 10 (manta)
-Asus Transformer Infinity (ft700t)
-HTC Desire HD (ace)
-HTC Desire S (saga)
-HTC Sensation (pyramid)
-HTC Fireball (fireball)
-HTC Incredible 2 (vivow)
-HTC EVO (supersonic/CDMA)
-HTC One V (primou)
-HTC One S (ville/villec2)
-HTC One X (endeavoru)
-HTC One XL (evita)
-HTC Butterfly (dlxub1)
-HTC Droid DNA (dlx)
-HTC ONE GSM (m7/m7ul)
-Samsung Galaxy S4 (GT-I9505/jflte/jfltexx)
-Samsung Galaxy S2 LTE (skyrocket)
-Samsung Galaxy Note 2 (n7100/t0ltevzw)
-Samsung Galaxy Note 2 LTE (t0lte)
-Samsung Galaxy SIII (i9300/d2att/d2tmo/d2vzw/d2spr)
-Samsung Galaxy SIII Mini (golden)
-Samsung Galaxy Mini II (jena)
-Sony Xperia Z (C6603)
-LG Optiomus G (geeb)
-LG GT540 Optimus (swift)
-LG P990 OPTIMUS 2X/SPEED (p990)
-ZTE Sequence (warp2)

----- [CWM only] -----

-Samsung Galaxy SII (i9100/i9100G)
-Samsung Galaxy S2 AT&T (SGH-I777/SGH-I727)
-Samsung Galaxy Note (n7000)
-Samsung GalaxyS Captivate (SGH-I897)
-Samsung Galaxy S (i9000/M/T/galaxys/galaxysmtd)
-Motorola Droid2 (droid2)
-LG Optimus HD X4 (x3)

----- [TWRP only] -----

-Sony Xperia S(nozomi/LT30p)
-Sony Xperia Play(mint/LT26i)
-Kindle Fire HD 7" (tate)

----- [CUSTOM only] -----

-Samsung Galaxy S II Duos (SCH-i929)
-LG Optimus One CDMA (thuderc)
-LG Optimus Elite (m3s)
-Samsung Epic 4G Touch (SPH-D710)

As per the XDA Forum thread, Recovery Tools finds your custom recovery of choice for your rooted device and flashes it. Supporting an array of devices from a range of manufacturers, Recovery Tools allows you to skip the usual process of installing a custom recovery by doing it all for you in a fraction of the usual required time. It should be noted that not every device supported by Recovery Tools will have a choice between TWRP and ClockworkMod, as many of these devices only have one or the other developed.  However, if you have another custom recovery that you would like to flash, there’s an additional option allowing you to select another recovery to install from your internal or external memory.


DsLNeXuS also made Recovery Tools open source, with its source code found on Github for anyone who’s interested in tweaking and playing with the App.   You can raise any query related to the App by clicking on the publishers hyperlink above or visiting this thread.

Download the Recovery Tools App from Google Play here.


الأحد، 2 يونيو 2013

CyanogenMod 10.1 Nightly now available for Samsung Galaxy S IV for Sprint and Verizon

Back on the heels of CyanogenMod 10.1 Nightly (stable version) for HTC One, the CynogenMod team has launched a single build of CynogenMod 10.1 Nightly for Sprint and Verizon users in the United States.  The other service provider locked S IV versions are already available on the CyanogenMod website.

CyanogenMod 10.1 Nightly now available for Samsung Galaxy S IV for Sprint and Verizon


So, if you are staying in United States and are covered by either of the two service providers, you can download the Sprint (jfltespr) and Verizon (jfltevzw) builds at CyanogenMod's download page now.
CyanogenMod 10.1 Nightly now available for Samsung Galaxy S IV for Sprint and Verizon
Do remember this is the only flashable build available right now hence you may proceed with due caution or it would be rather wise to wait for release of a stable build from CyanogenMod.  The news is that the stable build is also reaching final stages of development at the CyanogenMod labs.  You are also requested to visit this Gapps page for further information regarding the Google Apps.  

If you still want to customise your SIV the build can be downloaded as under :

Via CyanogenMod

Vijay Prabhu

الأحد، 12 مايو 2013

HTC One users can now use CyanogenMod 10.1 Nightly build to permanently get rid of Sense UI

HTC One users can now use CyanogenMod 10.1 Nightly build to permanently get rid of Sense UI

I know many users are frustrated with the HTC Sense UI.  It has been a matter of great debate regarding the form and the functionality.  It has its own uses but often becomes to much of a spoil sport for a true Android fan.  There are many third party launchers available in the Google Play Store which can remove the Sense UI but once you remove the launcher you are back to square one.  

How would you like to do away with the Sense UI completely from your HTC One.  Thanks to the active CyangenMod community, you can now do so.  Official nightly build of one of the most popular Android  ROMs are now available for download. 

And this build comes with stock-like Android 4.2.2 experience to the One, which is shipping out of the company with Android 4.1.  Bonus of course, is the huge amount of customisation you can do with your HTC One right from  the notification bar to navigation controls.


IF YOU HAVE A UNLOCKED HTC One you can find the links here on the XDA Developer page.   Please remember modding is not good without any experience so if you are not good at tinkering let it be.  Be sure to read the full tutorial before you start your tinkering process.


The Mod though, has its own share of bugs.  The In-call audio for outgoing calls are little bit iffy so you will need to enable 'touch sounds' to have audio in outgoing calls. The IR sensor does not work and Wi-Fi calling is not possible with the current mod.

Other bug are yet to be discovered so if you come up with one report the same to the XDA developers forum.  Please post in your comments about the mod and its bugs, if any.  Kindly read my this post for the Nightly builds for Samsung Galaxy S IV for Sprint and Verizon.

Vijay Prabhu