الأحد، 31 ديسمبر 2017

Guide | How to Root Android LG G3 (All Variants)

Guide | How to Root Android LG G3 (All Variants).

Root Android LG G3. Now we will start our experiment to get access root on LG G3 all variant, rooting your android device allowing the user of a smartphone or other devices running the Android Operating system (Honeycomb, Gingerbread, KitKat, Lollipop, Marshmallow, and others) to get privileged access to all various Android system.

This is basic information about LG G3 specifications, LG G3 is the smartphone that comes with 5,5 Inches True HD-IPS + LCD capacitive touchscreen, 16M colors, Run on Android OS, v4.4.2 (KitKat), upgradable to v6.0 (Marshmallow) as it Operating System, Quad-core 2.5 GHz Krait 400 CPU, Qualcomm MSM8974AC Snapdragon 801 Chipset, GPU Adreno 330, combined with 2 GB of RAM as their engine. And you can enjoy exciting 13 MP on the main camera, and 2,1 MP on secondary camera. And this device released on 2014, June.

There are some advantages if you root your Android smartphone devices,
  • You have full control to your device.
  • You have full access to the device's system files.
  • and more...

Guide to Root LG G3.

  1. Make sure your device is LG G3 running KitKat or Lollipop
  2. Download and install this tool.
  3. You need to install .NET Framework if you run this program on windows 7 or earlier.
  4. Then download LG driver if you are not installing yet.
  5. Now, enable USB Debugging on your LG G3.
    • You can Go to Settings -> General -> About phone -> Software information,
    • Then tap Build number seven (7) times 
    • And then go to Settings -> Developer options and turn on USB Debugging.
  6. Now, connect your LG G3 to the computer using USB cable.
  7. Now do one of the following options below.
    • If you are using the GUI version (LG One Click Root 1.3) just run the LG One Click Root installer
    • if you are using the script (LG One Click Root 1.2) then double click on the LG Root Script.bat file
  8. Then follow all the next instructions.
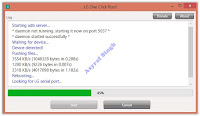
    LG one click root
    LG one click root
  9. If the process was already done, your LG G3 device will reboot.
  10. Finish.
  11. If you successfully root your device, you might see SuperSU apps installed on your app drawer.
    supersu
    supersu

Root Trouble shooting.

  1. If your LG G3 device does not recognize,
    • you can try to switch between MTP and PTP options.
    • Or, use a different USB cable.
    • Or, try to plug your USB cable into the different USB port.
  2. If you got "MSVCR100.dll is missing" error.
    • Try to install Visual C++ Redistributable.

Guide How to Flash Zip File using CWM (ClockWorkMod) Recovery.

Guide How to Flash Zip File using CWM (ClockWorkMod) Recovery.

 Flash Zip File using CWM Recovery. To following this guide your Android phone must be installed CWM Custom Recovery. So, if you need to install flashable file into your Android phone just place your flashable zip file in SD card then boot your device into Custom Recovery mode. for example we want to install a custom ROM, Custom Recovery or installing GApps.

Pre Requisites.

  1. Your Android phone must have root access.
  2. Install Custom Recovery (CWM) on your device. See this guide 
  3. http://guidebelajar.blogspot.com/2016/08/guide-how-to-flash-custom-recovery-twrp-cwm.html

Guide to Flash Zip File CWM Recovery.

  1. Boot your Android phone into Recovery Mode.
  2. For most Android phone, you can press and hold Power button + Volume Down button for a seconds,
  3. Release all button when your phone enter a recovery mode.
  4. Once you are in CWM recovery, you should see something like picture shown below.
    CWM (ClockWorkMod) Recovery.
    CWM (ClockWorkMod) Recovery.
  5. Then, tap install Zip From SD card.
    install Zip From SD card.
    install Zip From SD card.
  6. Then, select zip file where you save on SD card. by select choose zip from sdcard
    choose zip from sdcard
    choose zip from sdcard
  7. Once you have selected your zip file, it’s time to flash the file.
    zip file - cwm recovery
    zip file - cwm recovery
  8. Once flashing process finish, now select wipe data / reset
    wipe data / reset - cwm recovery
    wipe data / reset - cwm recovery
  9. Reboot your phone, finish.

Hard Reset Android LG G VISTA ALL MODELS to Restore Factory Setting | Guide.

Hard Reset Android LG G VISTA ALL MODELS to Restore Factory Setting | Guide. 

Hard Reset LG G VISTA ALL MODELS. This device also known as LG G Vista D631. You can follow this guide below if you have any problem on your LG G VISTA such as,  remove forgotten password, forgotten PIN, and pattern lock, or when your android device run abnormally. And this task is also known as restore factory setting. LG G VISTA ALL MODELS is the Android smartphone that comes with 5,7 Inchi, work on Android OS, v4.4.2 (KitKat), and supported Quad-core 1.2 GHz Processor, Qualcomm Snapdragon 400 chipset,  combined with 1,5 GB of RAM, 8 MP on Primary camera and 1,3 MP on secondary camera. This LG G VISTA ALL MODELS is released on, August 2014.

Hard reset or factory reset will remove all data and setting on your android device. such as :
  1. Contacts. (Phone, BBM, WhatsApp, etc)
  2. Email accounts.
  3. Downloaded apps
  4. System and app data
  5. Media (Music, pictures, and videos, etc.)

    #1. Hard Reset LG G VISTA ALL MODELS Using Menu:

    1. Make sure your battery is fully charged, Recommended you have 80% of battery capacity
    2. Then Backup your LG G VISTA ALL MODELS. see this guide
    3. Now, from the Home Screen tap Apps.
    4. Then tap Settings.
    5. Tap General Tab -> Backup & Reset.
    6. Tap Factory Data Reset to restore default settings.
    7. Tap Reset Phone -> Delete All to perform a factory reset. Now your LG G VISTA ALL MODELS will reboot when reset is complete.

    #2. Hard Reset LG G VISTA ALL MODELS Using Hardware Keys:

    1. Make sure your battery is fully charged, we recommended that your battery has 75% power
    2. Always BackUp your important data that store in LG G VISTA ALL MODELS. see this guide 
    3. Power Off your LG G VISTA ALL MODELS by press and hold Power Button for a second.
    4. Release any SIM card and SD card that was installed on your LG G VISTA ALL MODELS smartphone.
    5. Now, press Power Button for 5 seconds.
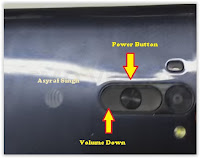
    6. Then, press and hold a combination keys Power Button + Volume Down at the same time.
    7. hard reset lg G VISTA ALL MODELS
      hard reset lg G VISTA ALL MODELS
    8. Now, Release power button only, and then continue to hold again. when your phone vibrate and show LG logo on the LCD screen.
    9. Now, release all button when your screen show factory data reset menu.
    10. Wait a while, you will enter Factory Data reset to erase all user data and restore the default setting.
    11. On this screen, you can use Volume Up or Volume down button to select menu and execute your choice using the power button.
    12. If you select Yes your phone will start to erase all user data and restore the default setting, and your phone will show the screen like the picture as shown below.
      Hard Reset LG RAY.
    13. You can wait a while for  LG G VISTA ALL MODELS to reboot system
    14. Done, your hard reset process success now.

    [Guide] Hard Reset Android LG X POWER to Remove Forgotten Password / PIN.

    [Guide] Hard Reset Android LG X POWER to Remove Forgotten Password / PIN. 

    Hard Reset LG X POWER. If you have any problems with your LG X power device, such as forgotten passwords or forget your PIN, forgotten pattern lock, you can follow this guide below to fix that problem. LG X POWER is the Android smartphone that comes with 5,3 Inchi, work on Android OS, v6.0 (Marshmallow), and supported Quad-core 1.3 GHz Cortex-A53 Processor, MediaTek MT6735 chipset, combined with 2 GB of RAM, 13 MP on Primary camera and 5 MP on secondary camera. This LG X POWER is released in August 2016.

    When you perform the hard reset on the  LG X POWER device, you will remove all data and setting on your android device. such as:
    1. System and app data.
    2. Downloaded apps
    3. Email accounts
    4. Contacts.
    5. Media (Music, pictures, and videos, etc.)

      #1. Hard Reset LG X POWER Using Menu:

      1. Make sure your battery is fully charged, Recommended you have 80% of battery capacity
      2. Then Backup your LG X POWER. see this guide
      3. Now, from the Home Screen tap Apps.
      4. Then tap Settings.
      5. Tap General Tab -> Backup & Reset.
      6. Tap Factory Data Reset to restore default settings.
      7. Tap Reset Phone -> Delete All to perform a factory reset. Now your LG X POWER will reboot when reset is complete.

      #2. Hard Reset LG X POWER Using Hardware Keys:

      1. It's recommended that you must have at least 75% of battery power. Or make sure your battery is fully charged.
      2. Always BackUp your important data that store in LG X POWER. see this guide
      3. Power Off your LG X POWER by press and hold Power Button for a second.
      4. Release any SIM card and SD card that was installed on your LG X POWER smartphone.
      5. Now, press Power Button for 5 seconds.
      6. Then, press and hold a combination key Power Button + Volume Down at the same time.
      7. hard reset lg X POWER
        hard reset LG X POWER
      8. Then you will see the LG Logo and Android Logo appear on screen, 
      9. Wait a while, then your device will enter factory mode.
      10. Use volume down button to navigate all menu on this screen, and use the Power button to confirm your selection.
      11. Now your LG X POWER device will start to formatting data
      12. Once the process is finished LG X POWER, your device will Reboot now.
      13. Done, your hard reset process success now.

      Guide | How to Download And Install Google Apps (GApps) on Android Device.

      Guide | How to Download And Install Google Apps (GApps) on Android Device.

      Download And Install Google Apps. This guide will show you how to Download And Install Google Apps (GApps) on Android Smartphone. Google Apps need to access Google Apps and service on your Android phones. Once Google Apps installed on your Android phone it will include the following apps on it, such as ; Gmail, Google Play Store, Google Play Music, Maps, Youtube, Keyboard, Camera, Calendar, and much more.

      With Google Play Store you will able to access to the entire catalogue of Google content whether it’s games, apps, movies, music, books and more. And now, on this guide we will show you how to download the most recent GApps package and install it on your Android phones. Ok, let we start this guide.

      Pre Requisites.

      1. Your Android phone must have root access.
      2. Install Custom Recovery on your device. See this guide 
      3. http://guidebelajar.blogspot.com/2016/08/guide-how-to-flash-custom-recovery-twrp-cwm.html
      4. Install the GApps version that matches with your Android ROM.
        • for example ; if you are running Android 5.0 Lollipop, download and install GApps for Lollipop.
      5. Download GApps Here 
      6. https://www.androidfilehost.com/?w=files&flid=5648

      Guide to Install Google Apps (GApps) 

      1. Download GApps that match with your Android versions.
      2. Once the file successfully downloaded, save it to your SD Card. Put GApps outside a folder or where ever place you can remember it. for example put it on Download folder.
      3. Boot your Android phone into Recovery Mode.
        • For most Android phone, you can press and hold Power button + Volume Down button for a seconds,
        • Release all button when your phone enter a recovery mode.
      4. Once you are in recovery, you screen should show your recovery menu.
      5. Which recovery installed on your device ?
        • TWRP
          • If twrp installed on your device, you shuold see this image shown below.
            twrp recovery menu
            twrp recovery menu
          • Then, tap install.
            install - twrp recovery
            install - twrp recovery
          • Now, select zip file where you save on SD card.
            select zip file - twrp recovery
            select zip file - twrp recovery
          • Once you have selected your GApps file, now flash the file. you must swipe to confirm flash.
            swipe to confirm flash - twrp recovery
            swipe to confirm flash - twrp recovery
          • Once flashing process finish, now clear your cache and dalvik cache. confirm it by swipe to wipe.
            clear cache and clear dalvik cache - twrp recovery
            clear cache and clear dalvik cache - twrp recovery
        • If you installing CWM recovery, see this guide how to flash your ZIP file (GApps).
        • http://guidebelajar.blogspot.com/2016/08/guide-how-to-flash-zip-file-using-cwm-recovery.html
      6. Finish.

      [Guide] Flash / Update Firmware Samsung GALAXY S7 EDGE SM-G935F Using ODIN v3.11.1.

      [Guide] Flash / Update Firmware Samsung GALAXY S7 EDGE SM-G935F Using ODIN v3.11.1.

      Flash Stock Firmware On Samsung GALAXY S7 EDGE SM-G935F. This guide show you how to flash a stock ROM on Samsung GALAXY S7 EDGE SM-G935F using Odin V3.11.1 software. Before you decide to use this guide, we recommend using Samsung’s own utilities, Samsung Kies and OTA (Over-the-air). Only use this guide if you are 100% sure about the risks involved in flashing your device. guidebelajar is not responsible for any damage caused by following this guide.

      This Samsung android device is released on 2016, March. and available on USA, Global and Southeast  Asia. Samsung GALAXY S7 EDGE SM-G935F is the smartphone with 5,1 Inchi Super AMOLED capacitive touchscreen, 16M colors, work on Android OS, v6.0 (Marshmallow), with Quad-core 1.8 GHz CDual-core 2.15 GHz Kryo & dual-core 1.6 GHz Kryo CPU, Qualcomm MSM8996 Snapdragon 820 chipset, Adreno 530 GPU, combined with 4 GB of RAM and 12 MP of  Main camera and 5 MP on secondary camera. 

      Flashing process in android Smartphone is like reinstall process on windows computer PC, with flash your Samsung GALAXY S7 EDGE SM-G935F android device you can unbrick, downgrade, manually upgrade (instead of updating via OTA or Samsung Smart Switch), or restore Samsung's stock firmware instead of custom ROM. I make this guide just for you as user all Samsung GALAXY S7 EDGE SM-G935F variant.

      You need to read this guide carefully, so you can get the best result flashing on your Samsung GALAXY S7 EDGE SM-G935F. Cause you need to download necessary file, you must ensure that you have good internet connection in your computer device, this guide using a windows computer.

      Initial Step To Flash Samsung GALAXY S7 EDGE SM-G935F 

      Now, we have reached on beginning guide, so you must to do initial step to ensure everything run smoothly.
      1. Make sure your Samsung GALAXY S7 EDGE SM-G935F battery is not in a low battery state, a minimum of 80%. If the battery runs out in the middle of the Root, it can lead to failure
      2. Always perform backup your important data before flashing process, Cause this process will delete or erase the data in memory.
      3. Make sure you have installed a Latest of Driver Samsung  that support with your Smartphone, If you don't have, please download here 
      4. Original USB cable driver for your Samsung GALAXY S7 EDGE SM-G935F.
      5. Download Samsung Smart Switch, Here 
      6. Download Odin V3.11.1, Here 
      7. Firmware Samsung GALAXY S7 EDGE, you must Log In to download firmware via this link.
        • SM-G935F - Australia, Netherlands, United Kingdoms, Spain, New Zealand, Greece, Peru, Israel, France, Portugal, Poland, Italy, Argentina, Papua New Guinea, Ireland, Jamaica, Colombia, Turkey, Luxembourg, Macedonia, Hungary, Sweden, Romania, Bulgaria, Austria, Croatia, Bosnia, Slovenia, Mauritius, Morocco, Netherlands, Switzerland, Cyprus, Belgium, South Africa, Slovakia. Direct Link.

      Main Guide To Flash Samsung GALAXY S7 EDGE SM-G935F 

      1. You must download all necessary file.(Samsung USB driver or Smart Switch and Odin)
      2. Then you must install all driver or Samsung smart switch to your computer or PC.
      3. Extract Odin V3.11.1. file on the destination folder.
      4. To download Samsung firmware you must visit sammobile.com/firmwares/, you can download specific firmware file for your device model number. you must Log In with your registered account on this website.
      5. On the row menu at the top of page, you can select firmware.
      6. Then you must enter in search bar with your phone model number.
        Firmware Samsung GALAXY S7 EDGE SM-G935F
        Firmware Samsung GALAXY S7 EDGE SM-G935F
      7. Then select your country/carrier.
      8. Then you click on available country link.
      9. For Non-Premium member you can Select regular download.
      10. And Download button again. Approximately file size is 1,9 GB
      11. Wait until your file finish downloaded, after that you must extract all firmware file on specific folder on your computer.
      12. This is your file.
        Flash Stock Firmware On Samsung GALAXY S7 EDGE SM-G935F
        Flash Stock Firmware On Samsung GALAXY S7 EDGE SM-G935F
      13. Switch Off your Samsung GALAXY S7 EDGE SM-G935F to start flashing process.
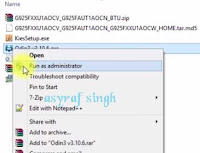
      14. Then, you must run Odin3 v3.11.1 by right click on Odin.exe and select Run as Administrator.
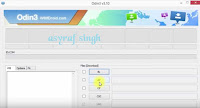
      15. When program is running, now you can click AP, and navigate to the *.tar or *.tar.md5 firmware file. 
      16. Now your firmware file has been inserted in Odin3 
      17. Then, Enter download mode your Samsung GALAXY S7 EDGE SM-G935F by pressing and hold Volume Down Button + Home Button + Power Button. Hold and press all button untill your phone vibrate and LCD show menu.
      18. download mode Samsung GALAXY S7 EDGE SM-G935F
        download mode Samsung GALAXY S7 EDGE SM-G935F
      19. And you will see picture like this on your LCD screen.
      20. Download Mode GALAXY S7 EDGE SM-G935F
        Download Mode GALAXY S7 EDGE SM-G935F
      21. On this mode, now you must connect your Samsung GALAXY S7 EDGE SM-G935F to your PC / laptop using a USB cable. 
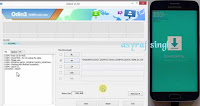
      22. After your phone connected, you will see a message appear that show your device added and there is info on the ID: COM at top left corner. Keep in mind for this COM vary depending on the PC / Laptop. Just Ignore all, in this picture you will see that your device is detected on (COM 5)
        Enter download mode samsung GALAXY S7 EDGE SM-G935F
        Port Com samsung GALAXY S7 EDGE SM-G935F
      23. Make sure re-partition is NOT ticked
      24. When everything already you can click Start Button. at the bottom left corner
      25. Just wait for the process to run about 2-5 minutes, and make sure there is no interference in this process. 
      26. When complete it will display a notification PASS and your smartphone Samsung GALAXY S7 EDGE SM-G935F will automatically restart.
      27. Wait your device to boot up, it will take a while.
      28. When your Samsung GALAXY S7 EDGE SM-G935F is ready to use, you can check your firmware update version by dial *#1234# on dial pad.
        dial pad samsung GALAXY S7 EDGE SM-G935F
        dial pad samsung GALAXY S7 EDGE SM-G935F
      29. And you will see your new firmware version.
        firmware version samsung GALAXY S7 EDGE SM-G935F
        firmware version samsung GALAXY S7 EDGE SM-G935F
      30. Finish.


      31. Warning.
        Never disconnect the USB cable while flashing process is running.
        Install Samsung Mobile Driver or Samsung Smart Switch if you don't see a sign in Odin.
        Flash your Samsung GALAXY S7 EDGE SM-G935F device at your own risk.
        Flashing firmware's which contains more than one *.tar.md5 file will wipe all data on internal storage.  Flashing official/stock firmware won't increase the binary flash nor KNOX WARRANTY VOID counter and won't cancel the Samsung GALAXY S7 EDGE SM-G935F device's warranty. 

      [Guide] Flash / Update Firmware Samsung GALAXY S7 SM-G930F Using ODIN v3.11.1.

      [Guide] Flash / Update Firmware Samsung GALAXY S7 SM-G930F Using ODIN v3.11.1.

      Flash Stock Firmware On Samsung GALAXY S7 SM-G930F. This guide show you how to flash a stock ROM on Samsung GALAXY S7 SM-G930F using Odin V3.11.1 software. Before you decide to use this guide, we recommend using Samsung’s own utilities, Samsung Kies and OTA (Over-the-air). Only use this guide if you are 100% sure about the risks involved in flashing your device. guidebelajar is not responsible for any damage caused by following this guide.

      This Samsung android device is released on 2016, February. and available on USA, Global and Southeast  Asia. Samsung GALAXY S7 SM-G930F is the smartphone with 5,1 Inchi Super AMOLED capacitive touchscreen, 16M colors, work on Android OS, v6.0 (Marshmallow), with Quad-core 1.8 GHz CDual-core 2.15 GHz Kryo & dual-core 1.6 GHz Kryo CPU, Qualcomm MSM8996 Snapdragon 820 chipset, Adreno 530 GPU, combined with 4 GB of RAM and 12 MP of  Main camera and 5 MP on secondary camera. 

      Flashing process in android Smartphone is like reinstall process on windows computer PC, with flash your Samsung GALAXY S7 SM-G930F android device you can unbrick, downgrade, manually upgrade (instead of updating via OTA or Samsung Smart Switch), or restore Samsung's stock firmware instead of custom ROM. I make this guide just for you as user all Samsung GALAXY S7 SM-G930F variant.

      You need to read this guide carefully, so you can get the best result flashing on your Samsung GALAXY S7 SM-G930F. Cause you need to download necessary file, you must ensure that you have good internet connection in your computer device, this guide using a windows computer.

      Initial Step To Flash Samsung GALAXY S7 SM-G930F 

      Now, we have reached on beginning guide, so you must to do initial step to ensure everything run smoothly.
      1. Make sure your Samsung GALAXY S7 SM-G930F battery is not in a low battery state, a minimum of 80%. If the battery runs out in the middle of the Root, it can lead to failure
      2. Always perform backup your important data before flashing process, Cause this process will delete or erase the data in memory.
      3. Make sure you have installed a Latest of Driver Samsung  that support with your Smartphone, If you don't have, please download here 
      4. Original USB cable driver for your Samsung GALAXY S7 SM-G930F.
      5. Download Samsung Smart Switch, Here 
      6. Download Odin V3.11.1, Here 
      7. Firmware Samsung GALAXY S7, you must Log In to download firmware via this link.
        • SM-G930F - Mexico, Open Austria, Australia, Portugal, Spain, France, Germany, Netherlands, New Zealands, Papua New Guinea, Czech Republic, United Kingdoms/Irelands, United Arab Emirates, Israel, Argentina, Poland, Colombia, Italy, Slovakia, Bulgaria, Dominican Republic, Brazil, Norway, Romania, Croatia, Cyprus, Luxembourg, Kenya, Saudi Arabia, Libya, Mauritius, Panama, Belgium, Slovenia,   Direct Link  

      Main Guide To Flash Samsung GALAXY S7 SM-G930F 

      1. You must download all necessary file.(Samsung USB driver or Smart Switch and Odin)
      2. Then you must install all driver or samsung smart switch to your computer or PC.
      3. Extract Odin V3.11.1. file on the destination folder.
      4. To download Samsung firmware you must visit Sammobile, you can download specific firmware file for your device model number. you must Log In with your registered account on this website.
      5. On the row menu at the top of page, you can select firmware.
      6. Then you must enter in search bar with your phone model number.
        Firmware Samsung GALAXY S7 SM-G930F
        Firmware Samsung GALAXY S7 SM-G930F
      7. Then select your country/carrier.
      8. Then you click on available country link.
      9. For Non-Premium member you can Select regular download.
      10. And Download button again. Approximately file size is 1,5 GB
      11. Wait until your file finish downloaded, after that you must extract all firmware file on specific folder on your computer.
      12. This is your file.
        Flash Stock Firmware On Samsung GALAXY S7 SM-G930F
        Flash Stock Firmware On Samsung GALAXY S7 SM-G930F
      13. Switch Off your Samsung GALAXY S7 SM-G930F to start flashing process.
      14. Then, you must run Odin3 v3.11.1 by right click on Odin.exe and select Run as Administrator.
      15. When program is running, now you can click AP, and navigate to the *.tar or *.tar.md5 firmware file. 
      16. Now your firmware file has been inserted in Odin3 
      17. Then, Enter download mode your Samsung GALAXY S7 SM-G930F by pressing and hold Volume Down Button + Home Button + Power Button. Hold and press all button until your phone vibrate and LCD show menu.
      18. download mode Samsung GALAXY S7 SM-G930F
        download mode Samsung GALAXY S7 SM-G930F
      19. And you will see picture like this on your LCD screen.

      20. Download Mode GALAXY S7 SM-G930F
        Download Mode GALAXY S7 SM-G930F


      21. On this mode, now you must connect your Samsung GALAXY S7 SM-G930F to your PC / laptop using a USB cable. 
      22. After your phone connected, you will see a message appear that show your device added and there is info on the ID: COM at top left corner. Keep in mind for this COM vary depending on the PC / Laptop. Just Ignore all, in this picture you will see that your device is detected on (COM 5)
        Enter download mode samsung GALAXY S7 SM-G930F
        Port Com samsung GALAXY S7 SM-G930F
      23. Make sure re-partition is NOT ticked
      24. When everything already you can click Start Button. at the bottom left corner
      25. Just wait for the process to run about 2-5 minutes, and make sure there is no interference in this process. 
      26. When complete it will display a notification PASS and your smartphone Samsung GALAXY S7 SM-G930F will automatically restart.
      27. Wait your device to boot up, it will take a while.
      28. When your Samsung GALAXY S7 SM-G930F is ready to use, you can check your firmware update version by dial *#1234# on dial pad.
        dial pad samsung GALAXY S7 SM-G930F
        dial pad samsung GALAXY S7 SM-G930F
      29. And you will see your new firmware version.
        firmware version samsung GALAXY S7 SM-G930F
        firmware version samsung GALAXY S7 SM-G930F
      30. Finish.


      31. Warning.
        Never disconnect the USB cable while flashing process is running.
        Install Samsung Mobile Driver or Samsung Smart Switch if you don't see a sign in Odin.
        Flash your Samsung GALAXY S7 SM-G930F device at your own risk.
        Flashing firmware which contains more than one *.tar.md5 file will wipe all data on internal storage.  Flashing official/stock firmware won't increase the binary flash nor KNOX WARRANTY VOID counter and won't cancel the Samsung GALAXY S7 SM-G930F device's warranty. 

      Guide How to Boot Android Phone Into Custom Recovery (Boot to CWM | TWRP)

      Guide How to Boot Android Phone Into Custom Recovery (Boot to CWM | TWRP).

      Boot into CWM / TWRP Custom Recovery. If your Android device already installed a custom recovery like TWRP or CWM or Bootloader is unlocked on your Android device, You might need this information guide to Enter your Android device into Custom Recovery. This is important stuff you must know when you want to install a Custom Recovery or Stock Recovery on your Android device, Boot into Custom Recovery is way how to install your Recovery.

      You can choose one of three methods below to boot your Android device into both of Custom Recovery (TWRP or CWM). Just follow this method below, It doesn't matter which of all the options below you choose, it really works for you.

      Guide to boot into Custom Recovery.

      1. First method. To enter your Android phone into Custom Recovery,
        • You must power off your Android phone first. 
        • After your Android phone fully shut down, now do the following step;
          Press and hold Power button + Volume Down for a minute.
        • If doesn't work try to press and hold Power button + Volume Up.
        • The combination key might vary for each Android device.
        • Then release all button when you see a list of options.
      2. Second Method. This method uses a computer to help us enter our Android phone into Custom Recovery.
        • We need a computer running Windows operating system.
        • Original USB Cable for your Android phone.
        • Enable USB Debugging on your Android phone. How to do it?
          • For KitKat see here  
          • http://guidebelajar.blogspot.com/2015/09/guide-how-to-enter-usb-debugging-mode_15.html
          • For Lollipop see here 
          • http://guidebelajar.blogspot.com/2015/09/guide-how-to-enter-usb-debugging-mode.html
        • Next step, you must install ADB or Android SDK on your computer, then you will need to go to the /platform-tools folder. Then open the command prompt.
        • When the command prompt window opens, just type the following command below.
          • adb reboot recovery
        • Then, press enters on the keyboard.
        • Now, your Android phone will start rebooting to Custom Recovery.
      3. Third Method. to following the third method, you must have root access to your Android device.
        • Once your Android phone has root access, just download a free app from google play store.
        • This App called Quick Boot
        • Download and install Quick Boot on your Android phone.
        • Once installed, open this App.
        • From this App, just select the way you want to reboot your Android phone.
        • Therefore, you can select reboot into Custom Recovery.

      السبت، 30 ديسمبر 2017

      [Guide] Flash / Update Firmware Samsung GALAXY A9 SM-A9000 Using ODIN v3.11.1

      [Guide] Flash / Update Firmware Samsung GALAXY A9 SM-A9000 Using ODIN v3.11.1.

      Flash Stock Firmware On Samsung GALAXY A9 SM-A9000. This guide show you how to flash a stock ROM on Samsung GALAXY A9 SM-A9000 using Odin V3.10.7 software. Before you decide to use this guide, we recommend using Samsung’s own utilities, Samsung Kies and OTA (Over-the-air). Only use this guide if you are 100% sure about the risks involved in flashing your device. guidebelajar is not responsible for any damage caused by following this guide.

      This Samsung android device is released on 2015, December. and available worldwide. Samsung GALAXY A9 SM-A9000 is the smartphone with 6,0 Inchi Super AMOLED capacitive touchscreen, 16M colors, work on Android OS, v5.1.1 (Lollipop), planned upgrade to v6.0 (Marshmallow), with Quad-core 1.8 GHz Cortex-A72 & quad-core 1.2 GHz Cortex-A53 CPU, Qualcomm MSM8976 Snapdragon 652 chipset, Adreno 510 GPU, combined with 3 GB of RAM and 13 MP of  Main camera and 8 MP on secondary camera. 

      Flashing process in android Smartphone is like reinstall process on windows computer PC, with flash your Samsung GALAXY A9 SM-A9000 android device you can unbrick, downgrade, manually upgrade (instead of updating via OTA or Samsung Smart Switch), or restore Samsung's stock firmware instead of custom ROM. I make this guide just for you as user all Samsung GALAXY A9 SM-A9000 variant.

      You need to read this guide carefully, so you can get the best result flashing on your Samsung GALAXY A9 SM-A9000. Cause you need to download necessary file, you must ensure that you have good internet connection in your computer device, this guide using a windows computer.

      Initial Step To Flash Samsung GALAXY A9 SM-A9000 

      Now, we have reached on beginning guide, so you must to do initial step to ensure everything run smoothly.
      1. Make sure your Samsung GALAXY A9 SM-A9000 battery is not in a low battery state, a minimum of 80%. If the battery runs out in the middle of the Root, it can lead to failure
      2. Always perform backup your important data before flashing process, Cause this process will delete or erase the data in memory.
      3. Make sure you have installed a Latest of Driver Samsung  that support with your Smartphone, If you don't have, please download here 
      4. Original USB cable driver for your Samsung GALAXY A9 SM-A9000.
      5. Download Samsung Smart Switch, Here 
      6. Download Odin V3.11.1, Here 
      7. Firmware Samsung GALAXY A9, you must Log In to download firmware via this link.

      Main Guide To Flash Samsung GALAXY A9 SM-A9000 

      1. You must download all necessary file.(Samsung USB driver or Smart Switch and Odin)
      2. Then you must install all driver or samsung smart switch to your computer or PC.
      3. Extract Odin V3.10.7. file on the destination folder.
      4. To download Samsung firmware you must visit Sammobile, you can download specific firmware file for your device model number. you must Log In with your registered account on this website.
      5. On the row menu at the top of page, you can select firmware.
      6. Then you must enter in search bar with your phone model number.
        Firmware Samsung GALAXY A9 SM-A9000
        Firmware Samsung GALAXY A9 SM-A9000
      7. Then select your country/carrier.
      8. Then you click on available country link.
      9. For Non-Premium member you can Select regular download.
      10. And Download button again. Approximately file size is 1,5 GB
      11. Wait until your file finish downloaded, after that you must extract all firmware file on specific folder on your computer.
      12. This is your file.
        Flash Stock Firmware On Samsung GALAXY A9 SM-A9000
        Flash Stock Firmware On Samsung GALAXY A9 SM-A9000
      13. Switch Off your Samsung GALAXY A9 SM-A9000 to start flashing process.
      14. Then, you must run Odin3 v3.11.1 by right click on Odin.exe and select Run as Administrator.
      15. When program is running, now you can click AP, and navigate to the *.tar or *.tar.md5 firmware file. 
      16. Now your firmware file has been inserted in Odin3 
      17. Then, Enter download mode your Samsung GALAXY A9 SM-A9000 by pressing and hold Volume Down Button + Home Button + Power Button. Hold and press all button until your phone vibrate and LCD show menu.
      18. download mode Samsung GALAXY A9 SM-A9000
        download mode Samsung GALAXY A9 SM-A9000
      19. And you will see picture like this on your LCD screen.
      20. Download Mode GALAXY A9 SM-A9000
        Download Mode GALAXY A9 SM-A9000
      21. On this mode, now you must connect your Samsung GALAXY A9 SM-A9000 to your PC / laptop using a USB cable. 
      22. After your phone connected, you will see a message appear that show your device added and there is info on the ID: COM at top left corner. Keep in mind for this COM vary depending on the PC / Laptop. Just Ignore all, in this picture you will see that your device is detected on (COM 5)
        Enter download mode samsung GALAXY A9 SM-A9000
        Port Com samsung GALAXY A9 SM-A9000
      23. Make sure re-partition is NOT ticked
      24. When everything already you can click Start Button. at the bottom left corner
      25. Just wait for the process to run about 2-5 minutes, and make sure there is no interference in this process. 
      26. When complete it will display a notification PASS and your smartphone Samsung GALAXY A9 SM-A9000 will automatically restart.
      27. Wait your device to boot up, it will take a while.
      28. When your Samsung GALAXY A9 SM-A9000 is ready to use, you can check your firmware update version by dial *#1234# on dial pad.
        dial pad samsung GALAXY A9 SM-A9000
        dial pad samsung GALAXY A9 SM-A9000
      29. And you will see your new firmware version.
        firmware version samsung GALAXY A9 SM-A9000
        firmware version samsung GALAXY A9 SM-A9000
      30. Finish.
      31. Warning.
        Never disconnect the USB cable while flashing process is running.
        Install Samsung Mobile Driver or Samsung Smart Switch if you don't see a sign in Odin.
        Flash your Samsung GALAXY A9 SM-A9000 device at your own risk.
        Flashing firmware which contains more than one *.tar.md5 file will wipe all data on internal storage.  Flashing official/stock firmware won't increase the binary flash nor KNOX WARRANTY VOID counter and won't cancel the Samsung GALAXY A9 SM-A9000 device's warranty. 

      Guide to Flash / Install Firmware Samsung GALAXY CORE LTE (SM-G386F) Using ODIN v3.11.1

      Guide to Flash / Install Firmware Samsung GALAXY CORE LTE (SM-G386F) Using ODIN v3.11.1

      Flash Stock Firmware Samsung GALAXY CORE LTE (SM-G386F). Now guidebelajar will show you guide to flash or install a new firmware on Samsung GALAXY CORE LTE (SM-G386F) Using ODIN v3.11.1. If you upgrade your Samsung device using this method you will get too many risks. So, We recommend using Samsung’s own utilities, Samsung Kies and OTA (Over-the-air) to upgrade your software. Use this guide if you are 96% sure about the risks involved in flashing your device. guidebelajar is not responsible for any damage caused by following this guide.

      This device is released on 2014, May. Samsung GALAXY CORE LTE (SM-G386F) is the smartphone with 4,5 PLS capacitive touchscreen, 16M colors, work on Android OS, v4.2.2 (Jelly Bean), Supported with Dual-core 1.2 GHz CPU, combined with 1000 MB of RAM and 2 MP of  Main camera and VGA on secondary camera. 

      Preparation.

      Below is the following things you must do before flashing your Android Samsung Smartphone device.
      1. Make sure your Samsung GALAXY CORE LTE (SM-G386F) is fully charged. or minimum has 80 % of battery capacity. It will avoid the flashing process failure.
      2. Flashing process will delete or wipe all data stored in internal memory. So, don't forget to backup all data before flashing device.
      3. Make sure you have installed a latest of the Samsung driver, that support with your device, If you don't have, you can download here 
      4. Original USB cable driver for your Samsung GALAXY CORE LTE (SM-G386F).
      5. Download Odin V3.11.1, Here 
      6. Download Official firmware file for the model number of your device, download it from - SamMobile, or you can visit samsung-updates.com/
      7. Or you can read Guide How to Download Official Samsung Firmware From SamMobile. Here 
      8. Firmware Samsung GALAXY CORE LTE , you must Log In to download firmware via this link.
        • SM-G386F - Spain, Romania, Netherlands, France, Hungary, Czech Republic, France, Poland, Bulgaria, Ireland - Here
        • SM-G3518 - China (China Mobile) - Here 

      Guide To Flash Samsung GALAXY CORE LTE (SM-G386F) 

      1. You must download all necessary file.(Samsung USB driver and Odin)
      2. Then, install all driver to your computer or PC.
      3. Extract Odin V3.11.1. file on the destination folder.
      4. Switch Off your Samsung GALAXY CORE LTE (SM-G386F) to start flashing process.
      5. Then, run Odin3 v3.11.1 by right click on Odin.exe and select Run as Administrator.
        Flash Stock Firmware On Samsung GALAXY CORE LTE (SM-G386F)
        Flash Stock Firmware On Samsung GALAXY CORE LTE (SM-G386F)
      6. When program is running, now you can click AP, and navigate to the *.tar or *.tar.md5 firmware file. 
        Flash Stock Firmware On Samsung GALAXY CORE LTE (SM-G386F)
        Flash Stock Firmware On Samsung GALAXY CORE LTE (SM-G386F)
      7. Now your firmware file has been inserted in Odin3 
      8. Then, Enter download mode your Samsung GALAXY CORE LTE (SM-G386F). See this guide how to do it. 
      9. On this mode, now connect your Samsung GALAXY CORE LTE (SM-G386F) to your PC / laptop using a USB cable. 
      10. After your phone connected, you will see a message appear that show your device added and there is info on the ID: COM at top left corner. Keep in mind for this COM vary depending on the PC / Laptop. Just Ignore all, in this picture you will see that your device is detected on (COM 5)
        Enter download mode samsung GALAXY CORE LTE (SM-G386F)
        Port Com Samsung GALAXY CORE LTE (SM-G386F)
      11. Make sure re-partition is NOT ticked
      12. When everything already you can click Start Button. at the bottom left corner
      13. Just wait for the process to run about 2-5 minutes, and make sure there is no interference in this process. 
      14. When complete it will display a notification PASS and your smartphone Samsung GALAXY CORE LTE (SM-G386F) will automatically restart.
      15. Wait your device to boot up, it will take a while.
      16. When your Samsung GALAXY CORE LTE (SM-G386F) is ready to use, now check your firmware version. See this guide how to check it. 
      17. Finish.


      18. Warning.
        Never disconnect the USB cable while flashing process is running.
        Install Samsung Mobile Driver or Samsung Smart Switch if you don't see a sign in Odin.
        Flash your Samsung GALAXY CORE LTE (SM-G386F) device at your own risk.
        Flashing firmware which contains more than one *.tar.md5 file will wipe all data on internal storage.  Flashing official/stock firmware won't increase the binary flash nor KNOX WARRANTY VOID counter and won't cancel the Samsung GALAXY CORE LTE (SM-G386F) device's warranty. 

      Guide How to Flash a Custom Recovery (TWRP or CWM) on Android Smartphone.

      Guide How to Flash a Custom Recovery (TWRP or CWM) on Android Smartphone.

      Flash a Custom Recovery (TWRP or CWM). This guide we will explain to you how to install or flash custom recovery like TWRP or CWM on Android device. Custom Recovery used to flash / install a custom ROM's or Recovery image to your device. 

      If you install a custom recovery to your Android device you can do something on your device, such as ;
      1. Install / Flash custom ROMs.
      2. Create and restore a backup image.
      To install a custom Recovery on your Android phones, You have to unlock the bootloader first.
      This method below work on most Android phone, such as ;
      • Samsung Galaxy S III
      • Samsung Galaxy S4
      • Samsung Galaxy Note 3
      • Samsung Galaxy Note 2
      • Samsung Galaxy S5
      • HTC One (M8), 
      • LG G3, 
      • LG G2, 
      • Moto X, 
      • Moto G, 
      • Sony Xperia Z1, 
      • Sony Xperia Z2, etc.

      Guide to Flash Custom Recovery.

      1. Download and install a USB Driver for your Android phone, find this driver on the official website of the company that made the phone. Below is recommend link to the latest driver for your phone.
        • Motorola 
        • https://motorola-global-portal.custhelp.com/app/answers/detail/a_id/88481
        • Sony 
        • http://developer.sonymobile.com/downloads/drivers/
        • LG  
        • http://www.lg.com/us/support/mobile-support
          • Go to Software updates -> Select your phone -> Click on Install USB Drivers
        • Samsung 
        • http://www.samsung.com/us/support/downloads
        • HTC 
        • http://www.htc.com/www/support/htc-one/news/
      2. Download and Install Android SDK on your computer. download it form Here 
      3. https://developer.android.com/sdk/index.html?hl=sk
      4. Download the latest custom recovery.
        • TWRP  
        • http://teamw.in/project/twrp2 
          • Go to the website, 
          • Then click Get TWRP for your device
          • Now, type your device's name to download the image.
        • CWM 
        • https://www.clockworkmod.com/rommanager
          • Go to the website, 
          • Then click Get CWM for your device
          • Now, type your device's name to download the image.
      5. Enable USB debugging on your device. How to do it ?
        • For Kitkat see here  
        • http://guidebelajar.blogspot.com/2015/09/guide-how-to-enter-usb-debugging-mode_15.html
        • For Lollipop see here 
        • http://guidebelajar.blogspot.com/2015/09/guide-how-to-enter-usb-debugging-mode.html
      6. Now, connect your Android phone to the computer via USB cable. 
      7. Then, open command prompt, just press windows key on keyboard, then type cmd, then press enter.
      8. Once command prompt window open, change directory to the place where Android SDK installed. for example Android SDK installed on ;
        • C:\Android SDK\a\sdk\platform-tools
          command prompt - android sdk
          command prompt - android sdk
      9. Now, type the following command in command prompt.
        • adb devices 
        • Make sure your device is listed, then type ; 
        • adb reboot bootloader
        • Wait for the phone to reboot in bootloader mode.
      10. Now, go to the platform-tools directory (a sub-directory of the Android SDK), Then open Command Prompt there, How to do it ?
        • Prees and hold Shift + Right-click
        • Then select Open Command Window here
      11. Now, type the following command in command prompt again
        • fastboot devices 
        • Make sure your device is listed, then type ; 
        • fastboot flash recovery FILE.IMG
        • Replace ‘FILE.IMG’ with the recovery you want to flash
      12. Wait, once flashing process complete, don't reboot your Android device manually.
      13. You must go to ‘Recovery’ by using volume down to scroll. Don’t scroll using the Volume Up button.
      14. Volume UP button used to confirm your selection. 
      15. Once you have gone to ‘Recovery’, only then press the Volume Up to boot in recovery mode.

      [Guide] Hard Reset Samsung Z3 To Restore Factory Setting & Remove Forgot Pattern/PIN/Password.

      [Guide] Hard Reset Samsung Z3 To Restore Factory Setting & Remove Forgot Pattern/PIN/Password.

      Hard Reset Samsung Z3. Samsung Z3 has this version (Z300H/DD (India)), This device is released on October, 2015. And today's guidebelajar will explain to you how to perform hard reset on Samsung Z3 smartphone. Please keep in mind, this tutorial will erase all data saved on your internal memory. Samsung Z3 is the smartphone with 5,0 Inchi Super AMOLED capacitive touchscreen, 16M colors, work on Tizen OS, v2.3, upgradable to v2.4, and supported with Quad-core 1.3 GHz, Spreadtrum chipset, combined with 1 GB of RAM, 8 MP on primary camera and 5 MP on secondary camera to capture best moment and make a selfie on your life.

      Most of Android user say that Hard reset process is call with master reset or factory reset. Many people asking why shoud we perform hard reset to our phone. The logical answer that can I say for this asking is :
      • We will give our Samsung Z3 away to some one else, and we don't want that one know everything about our secret data, so we have to erase all data before back up it.
      • There are many bug on Samsung Z3.
      • Because we will sell our Samsung Z3 Android phones
      • We want to remove all personal data and setting that was stored in Samsung Z3.device.
      • Our Samsung Z3 has been lagging and stuck on android logo, this call with bootloop
      • Samsung Z3 has a persistent problem that cannot be solved.
      • We have forgotten on PIN or Patern Lock at Samsung Z3.
      • and many other reason.

      1st Methode. Hard Reset Samsung Z3 Using Menu :

      1. Make sure your batery is fully charged, Recomended you have 80% of battery capacity
      2. Then Backup your Samsung Z3. See This Guide

      3. Go to menu: System Setting >
      4. Select Backup and Reset >
      5. Factory Data Reset > 
      6. Reset Phone
      7. Choose Erase everything to confirm that you already to perform hard reset on Samsung Z3
      8. Samsung Z3 will continue to hard reset process to restore factory default.

      2ndMethode. Hard Reset Samsung Z3 Using Hardware Keys:

      1. Make sure your battery is fully charged, we recomended that your battery has 80% power
      2. Always BackUp your important data that store in Samsung Z3. see this guide
      3. Turn Off your Samsung Z3 by hold and press Power Button for a second.
      4. Release any SIM card and SD card that was installed on your Samsung Z3 smartphone.
      5. Then press and hold together a combination button Volume Up + Home Button + Power button   at same time for a seconds.
        Hard Reset Samsung Z3
        Hard Reset Samsung Z3
      6. Then you will see Samsung Galaxy J7 Logo. On this step release Power Button only, while keep holding Volume Up and Home Button.
      7. Release all button when your device enter Tizen System Recovery.
      8. On this screen you can select menu Phone Reinitialization. Scroll down using Volume Down button, and confirm it using Power Button.
      9. Then Select Yes. This will erase all data on your device except SD-Card.
      10. Now, wait the hard reset process to restoring setting to factory defaults.
      11. After a few minute hard reset process will finished, then reboot your device
      12. Done, your hard reset process success now.