‏إظهار الرسائل ذات التسميات root. إظهار كافة الرسائل

الأربعاء، 16 نوفمبر 2016

Cara mudah Root Xiaomi Redmi Note 4 tanpa PC


Dadroidrd.com, Sudah menjadi hal yang biasa ketika pengguna device Android ingin melakukan Root terhadap device yang mereka miliki, dan terkhusus untuk pengguna Xiaomi Redmi Note 4 di luar sana, dan kabar baiknya saat ini kalian sudah bisa melakukan Root terhadap Xiaomi Redmi Note 4 kalian tanpa membutuhkan kemampuan PC, dengan aman dan pastinya persentasi keberhasilannya mencapai 100%.

Hanya saja sebelum kalian melakukan Root terhadap device satu ini kalian harus memenuhi persyaratan umum yang sudah di sediakan, dan jika sudah terpenuhi maka dalam pengerjaan tutorial ini hanya akan membutuhkan waktu kurang dari 5 menit saja dan device Xiaomi Redmi Note 4 kalian sudah dalam keadaaan Rooted, meski persyaratan Root cukup ribet, namun cara inilah satu-satunya yang menjadi rekomendasi karena terbukti aman dan ampuh dan inilah beberapa persyaratan uatam yang harus kalian penuhi terlebih dahulu sebelum melakukan Root pada Xiaomi Redmi Note 4 :
1. Sudah Unlock Bootloader, jika belum ikuti cara unlocknya DISINI
2. Sudah terpasang custom recovery TWRP, ikuti tutorialnya DISINI
3. Files Root SuperSU download DISINI atau DISINI

Baca juga :
Cara fastboot Xiaomi Redmi Note 4

Cara pengerjaan :
1. Setelah files super SuperSU di download dalam format .zip tersebut, segera copykan atau pindahkan files tersebut kedalam internal storage device kalian.
2. Lalu masuk ke menu TWRP recovery mode dengan cara menekan volume up (+) dan power secara berbarengan ketika device dalam keadaan mati sempurna, lalu flash files Root SuperSU yang sudah kalian pindahkan ke internal storage kalian sebelumnya.
3. Jika proses flashing sudah selesai, silahkan kalian reboot device kalian, dan secara otomatis aplikasi SuperSU dan kemampuan Root sudah terpasang, untuk mengecek kondisi Rootnya, gambarannya akan seperti DISINI.
4. Selesai!

Baca juga :
Cara unbrick atau fastboot Xiaomi Redmi 4 Prime

Perlu kalian ketahui kembali jika kalian melakukan cara ini maka lalukan dengan resiko kalian sendiri, jika terjadi suatu kesalahan atau kerusakan itu bukan tanggung jawab dari kami, untuk method ini sudah kami coba terlebih dahulu dan berhasil melakukan root secara 100%, jadi jika kalian sudah mengikuti tutorial ini dengan benar maka dapat di pastikan tutorial ini akan sukses sepenuhnya tanpa ada suatu kerugian yang berarti.

الجمعة، 10 أبريل 2015

Android上でROMをバックアップしたりZipをフラッシュ可能なFlashFireの紹介

AndroidでROMをバックアップしたりZipをフラッシュする際にはカスタムリカバリーが必要になりますが今回紹介するFlashFireを利用することでアプリから簡単に作業を行う事ができます。


使用するにはSuperSUが必要でCyanogenMod内蔵のRoot管理ソフトのみではFlashFireにRoot権限を与えることが出来ませんでした。


現在のバージョンで可能な作業はROMのバックアップ、リストア、初期ROMのフラッシュ、ZIPのフラッシュ、Wipeです。


試しにFullを行ってみます。


するとこのようにロード画面が表示されその後バックアップが始まります。
そこそこ時間がかかり操作も受け付けなくなるのでバッテリー残量にご注意ください。

こうしてバックアップしたデータはリストアから復元可能です。

その他には、いわゆる初期ROMと呼ばれるファームウェアやOdin形式のファイル、ZIP形式のアップデートファイルをフラッシュなどカスタムROMを運用する上で必要不可欠な機能が盛りだくさんなアプリになっています。Nexus用のファクトリーイメージもPC無しで簡単に導入可能です。

現在アプリはベータ提供となっておりダウンロードするにはテスターになる必要があります。
Google+:https://plus.google.com/communities/116661625291346007584
テスター申請:https://play.google.com/apps/testing/eu.chainfire.flash
ダウンロード:https://play.google.com/store/apps/details?id=eu.chainfire.flash&ah=CBtJV8BBW-J9TldAshwqJZvXr0k
XDA:[Android 4.2+][ROOT] FlashFire - Play BETA - PREVIEW

الأحد، 8 فبراير 2015

How to Root Zenfone 6 Firmware 2.21.40.39


Since RootZenfoneV3 Can't Root Zenfone 6 with 2.21.40.39 Firmware Version, so i made this tutorial.

  1. Download recovery.img from 2.21.40.29 Firmware You can download HERE, or Mirror Here or you can extract it from 2.21.40.29 firmware
  2. ADB Fastboot Tool If you don't have it (Download Here)
  3. Flash recovery.img
  4. - Go to Fastboot (Turn off Device and Press Power+Volume Down)
    - Connect to PC/Laptop
    - Open ADB Folder, Shift+Right Click > Open Command Here
    - Type fastboot flash fastboot recovery.img
    - Wait Until Finish and Reboot
  5.  Root with RootZenfoneKitkat, Tutorial Here


الاثنين، 2 فبراير 2015

How to Root Zenfone 5 Firmware 2.21.40.44


Since RootZenfoneV3 Can't Root Zenfone 5 with 2.21.40.44 Firmware Version, so i made this tutorial.

  1. Download Fastboot.img from 2.21.40.30 Firmware Download Here or Mirror HERE, or  you can extract it from 2.21.40.30 firmware
  2. ADB Fastboot Tool If you don't have it (Download Here)
  3. Flash Fastboot.img
  4. - Go to Fastboot
    - Connect to PC/Laptop
    - Open ADB Folder, Shift+Right Click > Open Command Here
    - Type fastboot flash fastboot fastboot.img
    - Wait Until Finish and Reboot
  5.  Root with RootZenfoneKitkat, Tutorial Here


الثلاثاء، 23 ديسمبر 2014

How to Root ASUS Padfone S PF500KL


ASUS PadFone


A powerful & enhanced mobile experience–Meet the PadFone S,
the unique ASUS innovation that combines the best of the smartphone and tablet.

Caution: Rooting your phone may void your warranty! So I'm not responsible for any damages. Do it with your own risk!

ROOTMaster application can ROOT your device without PC or any software. Its just an application. But it can ROOT your device & it has many more features.

Features of ROOTMaster
● Without a computer, data cable, bid farewell to the cumbersome procedures, direct phone end ROOT
● A key management system boot entry, improve the speed of the phone up and running
● Phone memory for the system to optimize weight, built-in software to easily uninstall
● Precise management of all software running permissions, more stable and more power


How to Root:

  1. Go to Settings>Security>Tick "Unknown Sources"
  2. Install APK
  3. Click Root
  4. Download SUperSU / Superuser from Playstore

    Download:

    Root Master for ASUS Padfone S A500KL

    الأحد، 2 نوفمبر 2014

    [How to Fix] Failed to Apply OTA Update after using RootZenfoneKitkat


    How to fix can't Update OTA after using RootZenfoneKitkat, here to provide a solution.

    Update-Recovery.bat:
    Download: http://adf.ly/tf5Vp
    Mirror: http://adf.ly/tf5FH


    Recovery:
    ZenFone 5
     
    Download: http://adf.ly/tf5Pz 
    Mirror: http://goo.gl/5MUwZb

    ZenFone 6
     
    Download: http://adf.ly/tf5YN 
    Mirror: http://goo.gl/uOwKgY

    Download the Update-Recovery.bat and the corresponding <version>_<region>_recovery.img file, put Update-Reocvery.bat' inside the RootZenFoneKitKat folder and replace therecovery.img` in files folder with the one you've downloaded.

    Execute Update-Recovery.bat to flash stock recovery for your ZenFone and apply OTA update again, should fix the OTA problem.


    Source: http://23pin.logdown.com/posts/240246-zenfone-if-you-failed-to-apply-ota-update-after-using-rootzenfonekitkat

    الجمعة، 31 أكتوبر 2014

    How to Root ASUS Fonepad 7 FE 170CG


    This article will teach you to root your ASUS Fonepad 7 FE 170CG

    Resources:
    Instructions:
    1. Download Resources above and Install Intel USB Driver for Android Devices (filename: IntelAndroidDrvSetup1.1.5 .exe)
    2. Activate USB Debugging (Go to Settings > About >Software Information >tap 7x build number) back to Settings>Developer Options>Tick USB Debugging
    3. Connect Asus Fonepad 7 to PC/Laptop, and Click Always allow to this computer
    4.  Go to Root Resources Folder and Open as Administrator RootGenius.exe
    5.  Open Task Manager, and Find  shuame_helper.exe and press Right Click>find Location or you can open cmd andy type ECHO %Temp%
    6.  Find Superuser Folder and Delete it, and Copy Superuser folder from Resources above and Paste there.
    7.  Back to RootGenius and Press Root Button
    8.  Wait until Finish, Be patient
    9. After Completed install SuperUser.apk from resources folder.
    DWYOR
     

    السبت، 18 أكتوبر 2014

    How to Root Asus Zenfone 4 KitKat


    Root Asus Zenfone 4 KitKat - After update to KitKat firmware on Asus Zenfone 4, maybe you are wondering to root your Zenfone 4. This time you do not need to be confused anymore Asus Zenfone Blog will share How to Root Asus Zenfone 4 KitKat.


    Preparing Tools :

    How to Root Asus Zenfone 4 KitKat

    DWYOR (Do With Your Own Risk)
    1. Install Intel USB Driver in PC / Laptop
    2. Extrack File "Root_Vx_Zenfone 4_T001.rar" to C:/Program Files /Intel Android Device USB driver
    3. Enable USB Debugging (Tutorial Here)
    4. Turn off your Zenfone
    5. Go to Droidboot / Fastboot Mode (pressing power + volume up)
    6. Connect your Zenfone with USB Cable to your PC/laptop
    7. Open Folder which Root file located, Click "OPEN.CMD"
    8. Check connection by type adb devices if connection successful will be a list of Zenfone device
    9. Type fastboot flash update root_zenfone4_v2.zip press Enter
    10. Wait until restart and Installation process done
    11. Done, Check if SuperSU is already Installed


    [Download] RootZenFone KitKat V3


    [Download] RootZenFone KitKat V3 


    RootZenFone KitKat V3 is the latest version of RootZenfone that in for by Shakalaca (thanks to him) . RootZenFone KitKat V3 is specifically made to function and can be used to rooted on Asus Zenfone KitKat, please Download RootZenFone KitKat V3.


    The main improvement in some cases:
    1. Asus Zenfone 5 is split into three programs (WW / TW / CHT), in accordance with its own version of the phone can download the corresponding toolkit.
    2. Asus Zenfone 6 is split into three programs (WW / TW), in accordance with its own version of the phone can download the corresponding toolkit.
    3. Most have a beginning of the script file set SkipUpdateBootloader=YES, If you hit in the process FAILED (remote: not allowed to update unsigned image on secure device)
    4. No condition ROOT amended OTA update when the first boot.

    Detailed instructions, please refer to the original: How To Easily Root Asus Zenfone 5 & 6 KitKat


    Download RootZenFone KitKat V3

    RootZenFone KitKat V3 Via ASUS Webstorage

    RootZenFone KitKat V3 Via MediaFire
    http://adf.ly/szZKd

     
    Change log:
    1. Split into 3 versions (WW/TW/CHT) use exact version or you may fail to apply future OTA update. (v1 only supports TW version) For those used v1 before, just run again to update correct recovery.
    2. For those encounter FAILED (remote: not allowed to update unsigned image on secure device), change set SkipUpdateBootloader=YES to set SkipUpdateBootloader=NO in the script and do it again. This will update your bootloader that supports unlocking.
    3. Fix error getting ROOT permission after OTA update.


    الاثنين، 13 أكتوبر 2014

    Bootloader entsperren & Root | Linux | OnePlus One

    Anleitung: Wie roote ich das OnePlus One unter Linux?
    Ich wollte dazu keine Anleitung schreiben aber auf Nachfrage mache ich das schnell und trocken. Um unser Gerät zu rooten, müssen wir den Bootloader entsperren. Daher besteht der Vorgang aus zwei Schritten. Selbst ein Anfänger wird hier keine Probleme haben, da es wirklich sehr einfach ist, wenn ein paar Punkte beachtet werden! Zum Thema Garantie gibt es alle Informationen hier (externe Link). Eure Daten solltet Ihr sichern, da das OnePlus One nach dem Entsperren des Bootloaders zurückgesetzt wird. 
    Startet das Terminal und führt diese zwei Befehle aus (Anleitung): 

    [1] sudo apt-get install android-tools-adb
    [2] sudo apt-get install android-tools-fastboot
    Jetzt müsst Ihr USB-Debugging an eurem OnePlus One aktivieren: 
    Einstellungen -> Über das Telefon -> mehrmals (hintereinander) auf Build-Nummer klicken -> "Entwickleroptionen aktiviert" -> Zurück (zu den Einstellungen) -> den neuen Punkt Entwickleroptionen aufrufen -> bei Android-Debugging (ältere Version USB-Debugging) einen Haken setzen und die Meldung mit OK bestätigen. 
    Jetzt die Displaysperre entfernen und das OnePlus One mit eurem Rechner verbinden:
    Hier einen Haken setzen (Von diesem Computer immer zulassen) und mit OK bestätigen. 
    Startet das Terminal: 
    Gibt zuerst den Befehl abd devices ein. Es muss eine Zahl erscheinen und daneben "device", wie oben im Bild. Nun geht es mit adb reboot-bootloader weiter. Euer OnePlus One wird neu gestartet und Ihr könnt das CyanogenMod Symbol mit der Unterschrift "Fastboot" sehen. Überprüft das mit dem Befehl sudo fastboot devices. Jetzt müsst Ihr nur noch sudo fastboot oem unlock eingeben und euer Bootloader wurde entsperrt. Mit sudo fastboot reboot wird euer OnePlus One neu gestartet. 
    Solange euer OnePlus One neu startet besorgen wir uns ein Custom Recovery. Hier empfehle ich TWRP (Link). Einfach auf Download the newest .img file here klicken und die neuste Version herunterladen. Sobald euer OnePlus One neu gestartet ist, einfach über das One auf diese Homepage gehen und die Datei UPDATE-SuperSU-vX.XX.zip herunterladen (könnt diese natürlich auch über den Rechner herunterladen und auf euer One kopieren).
    Öffnet das Terminal und wechselt in das Verzeichnis, wo sich die eben heruntergeladene Datei befindet (wie geht das). Zusätzlich könnt Ihr den Namen des Recoverys ändern, um die Befehle (weiter unten) einfach kopieren zu können. Dazu müsstet Ihr die Datei in recovery.img umbennen. 
    Mit ls überprüfen, ob wir uns im richtigen Ordner befinden (in meinem Fall recovery.img zu sehen), dann mit adb reboot-bootloader das OnePlus One in die fastboot mode bringen (wie zu Beginn). Das ganze überprüfen wir mit sudo fastboot devices (muss wie oben im Bild sein) und mit dem Befehl sudo fastboot flash recovery recovery.img (recovery.img durch den Namen eures Recoverys ersetzen) wird das Recovery geflasht/installiert. Jetzt geben wir sudo fastboot boot recovery.img ein und warten 30 bis 50 Sekunden. 
    Nun ist euer OnePlus One im TWRP Recovery. 
    Hier wählt Ihr Install -> sucht die UPDATE-SuperSU-vX.XX.zip -> klickt auf diese -> wischt bei swipe to install von links nach rechts und euer One wird gerootet. 
    Klickt dann auf Reboot System und wir wären fertig. 
    Über das SuperSU Icon könnt Ihr dann die Root-Rechte verwalten. 

    السبت، 11 أكتوبر 2014

    How to Root Zenfone 4 With RootZenfone APK


    Credit to Shakalaca for RootZenfone APK
    Tested by: Areph Doank
    Thanks to https://www.facebook.com/groups/262032920649918/
    ==========================================================================


    DWYOR
    JellyBean Only

    Resource:
    Instructions:
    1. Install RootZenfone
    2. Open Zenfone 4 Back Case (For Removing Battery)
    3. Disable Sim 1 and 2, Turn off Wifi (Forget all wifi configuration)
    4. Open RootZenfone, Choose OK, i know please root
    5. Wait until the process complete (Wait >15 secs until the display goes blank and "unfortunatelly, live demo was stopped) and the display blank without statusbar.
    6. Remove the Battery 
    7. Place the battery and Turn on Zenfone 4 (Will show boot animation "android" and automatically restart until show asus boot animation)
    8. Done


    الأحد، 5 أكتوبر 2014

    [Zenfone] How to Root Zenfone 5 and Zenfone 6 (Kitkat/4.4.2)


    Previously mentioned can be packaged on a PC running the program on ZenFone 5/6 KitKat version root, these days, spent some time packing Well, here with some simple instructions hope to help the less likely operating adb and fastboot.

    Of course there is some pre-work was first performed, the computer (Windows series) must first install Intel's USB driver for Android devices, because of copyright issues can only provide links to download the installation. Also, if the developer does not know how to open the menu in Android and enable USB debugging, you can also install using PCLink time to achieve the same effect. If there Bluestacks or executive class Genymotion the Android emulator, please remember to turn off, so as not to affect the ROOT program.

    ZenFone 5 KitKat ROOT 包:
    Link:http://goo.gl/jiqqcQ (ASUS WebStorage)
    Mirror:http://goo.gl/WDKALI (MediaFire)
    ZenFone 6 KitKat ROOT 包:
    Link:http://goo.gl/Bvhjnu (ASUS WebStorage)
    Mirror:http://goo.gl/GVPXnH (MediaFire)

    After extract ROOT package, put the phone to the computer via USB cable (remember to turn on USB debugging) Click CheckBeforeAction.bat, pursuant to the onscreen instructions needed to confirm whether the device has caught

    1. The first is the ASUS Android Composite ADB Interface, if you have not installed the driver installation screen will appear :( to ZenFone 6 as an example)
    2.  Open Device Manager to confirm installation was successful:
    3.  then re-boot into bootloader, then the driver will be installed once :( to ZenFone 6 as an example)
    4.  you can open the Device Manager view:
    5.  When these two devices appear correctly in the computer, click on Root-ZenFone6-cht.bat (Chinese description) or Root-ZenFone6-en.bat (English description) batch file, follow the instructions to start ROOT program. The phone will reboot several times (about 6 times) after click EnterShell.bat check whether there is a successful ROOT, then the column will pop up a command prompt, you just type su and press Enter, and then to see whether the phone dialog box appears asking permission to some words of congratulations: Success ROOT Hello!

      Just click ROOT permissions you want to lift UnRoot-ZenFone6-cht.bat or 'UnRoot-ZenFone6-en.bat` can, steps are the same. Currently only tried on Windows 7, so there is a problem .. welcome return. :)


    Credit to him for making this useful tutorial

    السبت، 4 أكتوبر 2014

    One Click Root For Zenfone (Kitkat/JB)


    How to Root Zenfone (Kitkat/JB) 
    Tutorial from Raditz Room Tested by Him

    Resources:
    1. Towelroot, SuperSU (Download)
    2. Do it With Your Own Risks

    Instructions:

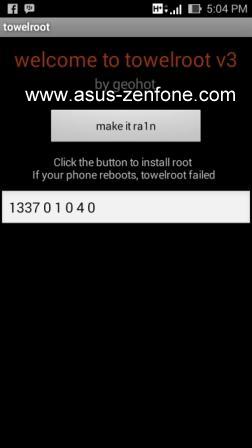
    1. Download APK and Open it (ignore Device is not Compatible)
    2. Into Towelroot app, click “welcome to towelroot v3″ 3 times and enter the number text: 1337 0 1 0 4 0 (see screeenshot) and click "make it rain"
    3. wait for 5 minutes until your zenfone reboot
    4. Install SuperSU app
    5. you can change to SuperSU Pro by uninstalling SuperSU with Root Uninstaller

    Screenshot:


    How to Root Zenfone (Kitkat/JB)

    All Tutorial and Screenshoot Credit to Raditz Room
    Towelroot Credit to GeoHot

      الجمعة، 3 أكتوبر 2014

      How To Root Zenfone 5/6 Kitkat [4.4.2]


      Method One:

      1. Downgrade version of the previous version to 1.18.40.10
      2. Enter recovery do a wipe data (factory reset)
      3. Use RootZenFone be root and activate survival mode
      4. Through Recovery sideload OTA upgrade package or OTA upgrade package to upgrade to 4.4 SD card thrown in the way


      Method two:

      1. Phone Bootloader is unlocked through the official app
      2. Brush a third-party recovery (CWM)
      3. Enter recovery brush root ( SuperSU or SuperUser )
      4. Brush back the original recovery and locked (optional necessarily do)

      Thanks to Shakalaca

      الأحد، 21 سبتمبر 2014

      Download RootZenfone 1.4.6r APK


      Credit to Shakahuang

      RootZenFone APK / RootZenUI APK 
      from this edition have been extended for 10 seconds and then reboot after click root.


      Supported Models:
      • ZenFone 5 (T00F / T00J)
      • ZenFone 6 (T00G / Z002)
      • PadFone S (T00N)
      • ZenFone 5 LTE (T00P)
      • MeMO Pad 7 ME176C / ME176CX (K013)
      • MeMO Pad 7 ME70C (K01A)
      • Fonepad Note 6 ME560CG (K00G) v11.2.1.22 (factory reset before rooting)
      • Fonepad 7 FE375CG (K019)

      To be confirmed models:  
      * PadFone Mini (T00E)
      * MeMO Pad 8 (K011) should be ME181C
      * Transformer Pad TF303CL (K014)
      * Transformer Pad TF103C (K010) TF103CG (K018)
      * Fonepad 7 FE375CG (K019)
      * Fonepad 7 FE170CG (K012) 
      -> not working


      Instructions:
      *Turn off mobile data & wifi /Airplane mode
      *Open RootZenfone
      *Click Root, after 10 seconds Turn off, and Turn on wait until complete.

       RootZenfone 1.4.6r
       
       RootZenfone 1.4.6r
      Mirror

      الاثنين، 15 سبتمبر 2014

      Verzeichnisstruktur unter Linux | Linux-Handbuch

      Ich möchte hier noch einmal ganz kurz auf die Verzeichnisstruktur eingehen, da diese bestens bei ubuntuuser erklärt wird (externe Link). Es geht hier viel mehr um zwei Fragen, welche mir sehr oft gestellt werden.
      Öffnet man den Dateimanager (siehe hier), dann findet sich der Eintrag "Dateisystem", welcher die höchste Ebene in der Verzeichnisstruktur ist. Unter Windows wäre es der Laufwerksbuchstabe, wie zum Beispiel c:/ und unter Linux ist es /
      Wechsele ich jetzt in meinen persönlichen Ordner, dann bin ich bei /home/muhamed/
      Bedeutete: /home -> alle Dateien von allen Benutzern (Persönlicher Ordner & Desktop)
      So würde das bei mir aussehen. Würde ich im Terminal in dieses Verzeichnis wechseln (wie geht das?), dann würde das so aussehen:
      cd bedeutet nicht CD-ROM, es bedeutet change dictionary (Verzeichnis wechseln). Dahinter einfach der Ort (Groß- und Kleinschreibung ist zu beachten) und schon bin ich in diesem Ordner. Mit ls kann ich mir den Inhalt anzeigen lassen, wie oben im Bild zu sehen.
      Warum spreche ich jetzt gerade diese beiden Punkte an?
      Wenn ich die Bedeutung kenne, dann ist das Partitionieren sehr einfach. Ich habe eine Swap-Partition (sollte der Arbeitspeicher voll sein, dann soll dort ausgelagert werden), das Grundsystem / und dann die Dateien von den Benutzern /home
      Würde ich ein "anderes Linux" installieren oder das System neu installieren, dann könnte ich die /home Partition einfach so stehen lassen. Deshalb habe ich bei der Installation die freie Wahl, wie ich das System "aufteilen" möchte. Es kann aber auch einfach so gelassen werden, dann befindet sich die /home Partition auf der System-Partition.
      Habe ich zwei Festplatten, dann kann ich die /home Partition auf die andere Festplatte legen. In diesem Beispiel die SSD-Festplatte für das System und eine 2TB große Festplatte für die Dateien.
      Größe der Laufwerke ganz unten zu sehen
      Für 99% der "normalen Anwender" ist nur das Home-Verzeichnis wichtig, da sich dort unsere Dateien befinden.
      Solltet Ihr ein Android-Smartphone besitzen, dann könnt Ihr über Root-Rechte auch zur obersten Ebene / gelangen.
      Solltet Ihr eine Datei ausführen müssen, über das Terminal (was eigentlich nur sehr selten der Fall ist), dann könnt Ihr hier auch wie unter Windows vorgehen:
      Rechtsklick -> Eigenschaften -> Ort -> /home/muhamed/Downloads -> hier befindet sich die Datei. Der vollständige Link (Ort) zur Datei wäre somit:
      /home/muhamed/Downloads/Lubuntu_1404_For_BananaPi_v3_1_1.img

      Am Ende noch einmal kurz etwas zur Suchfunktion. Sollte eine Datei gesucht werden, dann ist das kein Hexenwerk unter Linux.
      Bei Ubuntu ist es die Dash (siehe hier), hier im Bild wäre es Linux Mint Cinnamon aber die Suche über den Dateimanager ist immer möglich:
      Mir ist bis heute nicht klar, wieso mir so oft die Frage gestellt wird, da es keinen Unterschied zu Windows gibt.

      Das Linux-Handbuch findet Ihr hier.